Specifier
Wishlist
Samples

Xenolith

Installation & Product Guide


Instructional Videos

Download the Xenolith Installation guide


Xenolith Installation Guide

  • Handling & Storage
    • When moving sheets, ensure care is taken to avoid scratching the decorative surface.
    • Store in an enclosed area protected from moisture and heat.
    • When storing vertically, place side exactly vertical and support over the full height.
    • When storing horizontally, support bearers should be no more than 600mm apart.
    • Ensure pooling of water on the surface cannot occur and allow sufficient ventilation and drainage in enclosed spaces.
    • Maximum overhang must not exceed 300mm.
  • Tooling

    Standard tools can be used for machining and processing such as sawing, drilling, and routing.

  • Finishing

    Neither the surface nor exposed edges need to be protected or sealed.

  • Drilling and Screwing

    polytec Xenolith is a very hard material. Use high-quality screws and ensure to predrill pilot holes or follow the directions recommended by the screw manufacturer. Be cautious not to overtighten.

    • The use of support sheets is recommended.
    • When drilling parallel to the surface (edge drilling), at least 3mm must remain from the hole.
    • When working with polytec Xenolith, ensure your tooling and hardware are resilient. Discuss with your hardware supplier suitable screws, hinges, and brackets for required strength and corrosion resistance.
  • Screw Location

    Screws should be carefully positioned to prevent splintering (minimum 20mm to edge). Screwing directly into the edge of a panel is not recommended. Metal brackets are recommended when fixing two panels together. Mitring of edges should be avoided as they are vulnerable to damage; a chamfered edge or crescent-shaped edge will avoid edge chipping.

  • Sawing

    To achieve optimum finishing, always use trial pieces to test before actual operation. Always ensure the decorative surface is facing upwards to prevent damage and chipping of the edges.

    • Use a carbide or diamond-tipped saw blade.
    • Ensure saw blades are sharp, and replace or sharpen as necessary.
    • Smooth all sharp sawn edges with fine sandpaper or a router.
  • Routing

    For routing edges, use a hard metal or diamond cutter at a slow speed to achieve proper finishing without burn marks. This can be done using a CNC machine or manually operated tooling.

    Manual Operated Routing
    Bit Diameter (mm) No. of Revolutions (rev/min) Speed (m/s) Feeding Speed (m/min)
    20 18000 20 5
    25 24000 30 -
  • Gluing and Mechanical Fixing
    • Under-bench cabinets must be manufactured with supports no larger than 600mm apart at the top of the cabinets.
    • Xenolith should not be installed on large flat panels as air is required to flow freely around both surfaces.
    • Use pre-drilled 10 gauge screws as mechanical fasteners no more than 600mm apart.
    • Ensure all joins are mechanically fixed and screwed to the supporting substrate at each end and throughout the joint.
    • Roughen the surface slightly and ensure all foreign matter is removed before applying adhesive.
    • Apply high-strength flexible adhesive in a snaking pattern over all contact surfaces.
    • Apply pressure using a mechanical fastener for 4–8 hours at 20°C as per the adhesive manufacturer's recommendations.
  • Splashback Installation

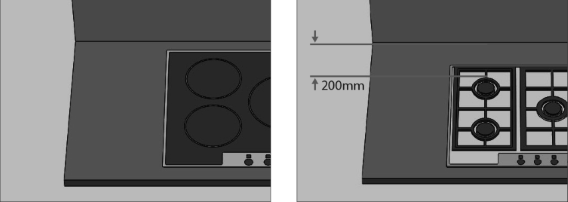
    polytec Xenolith can be used as a splashback. For heat and cleaning requirements, use full sheets wherever possible to avoid joins. Adhere to the minimum clearance guidelines for electric or gas cooktops:

    • 200mm clearance is required for gas cooktops.
    • Follow AG/601 guidelines for combustible splashbacks adjacent to electric cooktops.

    polytec Xenolith Splashback Installation